備忘録

備忘録

Node-Media-Serverを利用してストリーミングサーバを作る方法

Ⅰ. はじめに

タイトルの通り「Node-Media-Serverを利用してストリーミングサーバを作る方法」です。

Ⅱ. やり方

1. NodeJSをインストールする
curl -sL https://deb.nodesource.com/setup_14.x | bash -
apt-get install -y nodejs
2. Node-Media-Serverを初期化する
git clone https://github.com/illuspas/Node-Media-Server
cd Node-Media-Server
npm i
3. Node-Media-Serverの設定を変更する(任意)
$ vim app.js

const config = {
  http: {
    port: 80
  }
}
4. Node-Media-Serverを起動する
$ node app.js
5. サンプルプログラムを書く
<html>
  <head>
    <script src="https://cdnjs.cloudflare.com/ajax/libs/flv.js/1.5.0/flv.min.js"></script>
  </head>
  <body>
    <video id="player" autoplay muted width=640 height=480></video>

    <script>
      const videoElement = document.getElementById('player')
      const flvPlayer = flvjs.createPlayer({
        type: 'flv',
        url: 'ws://10.0.0.2/live/live001.flv'
        isLive: true,
        enableStashBuffer: false // falseを指定すると低遅延になる
        stashInitialSize: 1024 * 128, // 128 KB
        fixAudioTimestampGap: false, // 音ズレ防止
        autoCleanupSourceBuffer: true
      })
      flvPlayer.attachMediaElement(videoElement)
      flvPlayer.load()
      flvPlayer.play()
    </script>
  </body>
</html>
6. OBS等で配信を開始する

f:id:kagasu:20210121131124p:plain

実行結果

f:id:kagasu:20210121131151p:plain

メモ

その他方法

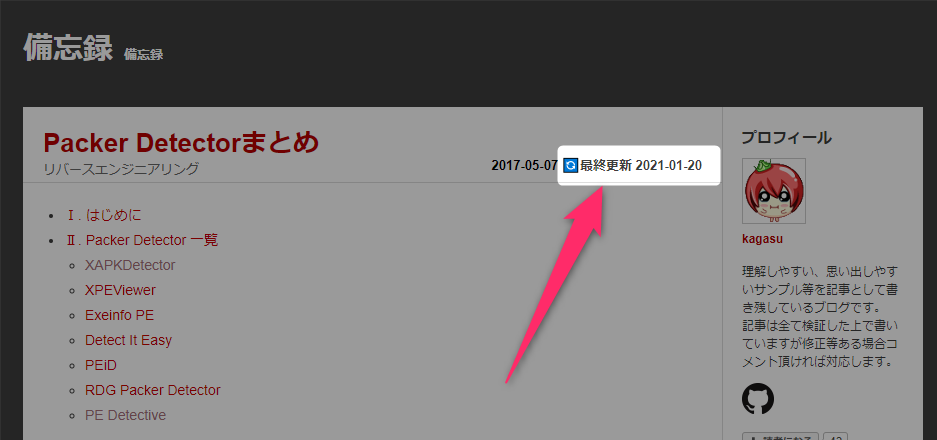
はてなブログで更新日時を表示する方法

2023/08/01追記

公式機能として実装されました。
本記事内容をあえて実行する必要はありません。
https://staff.hatenablog.com/entry/2023/08/01/160421

Ⅰ. はじめに

タイトルの通り「はてなブログで更新日時を表示する方法」です。

Ⅱ. やり方

1. 以下プログラムを「設定」→「デザイン」→「カスタマイズ」→「記事」→「記事下」に貼り付ける
<script>
async function getUpdatedAt () {
  const createdAt = new Date(document.getElementsByClassName('updated')[0].getAttribute('datetime'))
  const createdYear = createdAt.getFullYear()
  const createdMonth = createdAt.getMonth() + 1
  const response = await fetch(`${location.origin}/sitemap_periodical.xml?year=${createdYear}&month=${createdMonth}`)
  const text = await response.text()
  const xml = new DOMParser().parseFromString(text, 'text/xml')
  const item = Array.from(xml.querySelectorAll('urlset>url')).filter(x => x.querySelector('loc').textContent.includes(location.pathname))[0]
  const updatedAt = new Date(item.querySelector('lastmod').textContent)
  return updatedAt
}

(async () => {
  const updatedAt = await getUpdatedAt()
  const updatedYear = updatedAt.getFullYear()
  const updatedMonth = (updatedAt.getMonth() + 1).toString().padStart(2, '0')
  const updatedDate = updatedAt.getDate().toString().padStart(2, '0')

  const element = document.createElement('span')
  element.innerText = `🔄最終更新 ${updatedYear}-${updatedMonth}-${updatedDate}`
  document.getElementsByClassName('entry-date')[0].appendChild(element)
})()
</script>

実行結果

更新日時が表示された

Intel GVT-gを利用してiGPUを仮想化して使用する方法

Ⅰ. はじめに

タイトルの通り「Intel GVT-gを利用してiGPUを仮想化して使用する方法」です。

Ⅱ. 環境

  • Intel i7 8700
  • Ubuntu 20.04.1 LTS
  • Linux kernel 5.4.0
  • QEMU 4.2.1
  • BIOSの設定でVT-xとVT-dを有効に設定

Ⅲ. やり方

1. OS起動時にロードするカーネルモジュールを設定する
$ vim /etc/modules-load.d/kvm-gvt-g.conf
kvmgt
vfio_iommu_type1
vfio_mdev
2. GRUBの設定する
$ vim /etc/default/grub
GRUB_CMDLINE_LINUX_DEFAULT="i915.enable_gvt=1 kvm.ignore_msrs=1 intel_iommu=on"
3. GRUBの設定を反映する
update-grub
4. 再起動する
reboot
5. IOMMUが有効になったか確認する
$ dmesg | grep -E "IOMMU|enabled"
[    0.082046] DMAR: IOMMU enabled
6. iGPUのPCIアドレスを確認する
$ apt install pciutils
$ lspci | grep VGA
00:02.0 VGA compatible controller: Intel Corporation UHD Graphics 630 (Desktop)
7. サポートされているmdevデバイスを確認する
$ GVT_PCI=0000\:00\:02.0
$ ls /sys/bus/pci/devices/$GVT_PCI/mdev_supported_types/
i915-GVTg_V5_4  i915-GVTg_V5_8

※mdevデバイスの詳細確認方法

$ cat /sys/bus/pci/devices/$GVT_PCI/mdev_supported_types/i915-GVTg_V5_4/description
low_gm_size: 128MB
high_gm_size: 512MB
fence: 4
resolution: 1920x1200
weight: 4
8. vGPUを作成する
GVT_GUID=$(uuidgen)
GVT_PCI=0000\:00\:02.0
GVT_TYPE=i915-GVTg_V5_4
echo "$GVT_GUID" > "/sys/bus/pci/devices/$GVT_PCI/mdev_supported_types/$GVT_TYPE/create"
9. QEMUを起動する
qemu-system-x86_64 \
  -hda /root/ubuntu.qcow2 \
  -enable-kvm \
  -cpu host \
  -smp 4 \
  -m 8192 \
  -boot d \
  -vga std \
  -net nic \
  -k ja \
  -device vfio-pci,sysfsdev=/sys/bus/pci/devices/$GVT_PCI/$GVT_GUID,rombar=0
10. Intel Graphicsドライバをインストールする(オプション)
  • ゲストがWindowsの場合自動的にインストールされる場合があります

実行結果

仮想マシンでiGPUの認識に成功した

サーバの仮想化手法を調べる方法

Ⅰ. はじめに

タイトルの通り「サーバの仮想化手法を調べる方法」です。

Ⅱ. やり方

1. dmidecodeを使う方法
$ dmidecode -s system-product-name
KVM
2. systemd-detect-virtを使う方法
$ systemd-detect-virt
kvm
3. dmesgを利用する方法
$ dmesg | grep -i virtual
[    0.126010] Booting paravirtualized kernel on KVM
[    2.281507] input: VirtualPS/2 VMware VMMouse as /devices/platform/i8042/serio1/input/input4
[    2.288111] input: VirtualPS/2 VMware VMMouse as /devices/platform/i8042/serio1/input/input3
[    3.912526] systemd[1]: Detected virtualization kvm.

QEMUでWindowsを利用する方法

Ⅰ. はじめに

タイトルの通り「QEMUWindowsを利用する方法」です。

Ⅱ. 環境

Ubuntu 20.04.1 LTS

Ⅲ. やり方

1. KVMが利用できるか確認する(オプション)
apt install cpu-checker
kvm-ok
2. QEMUをインストールする
apt install qemu qemu-utils qemu-system-x86

# KVMが利用できる場合
# apt install qemu qemu-utils qemu-kvm
3. VM用のディスクイメージを作成する
qemu-img create -f qcow2 windows.qcow2 256G
4. QEMUを起動する
qemu-system-x86_64 \
#  -bios /root/OVMF.fd \
#  -boot menu=on \
  -hda /root/windows.qcow2 \
  -enable-kvm \
  -cpu host \
  -smp 4 \
#  -smp $(nproc) \
#  -smp 4,sockets=1,cores=2,threads=2 \
  -m 8192 \
  -boot d \
  -cdrom WindowsServer2019.iso \
  -vga std \
  -vnc 127.0.0.1:1 \
  -usb -device usb-tablet
  -net nic \
  -net user,hostfwd=tcp::3390-:3389,hostfwd=tcp::80-:80 \
  -k ja
  • TCP80番をTCP80番でアクセス出来るようにしています
  • RDP用のTCP3389をTCP3390でアクセス出来るようにしています
  • cpuとenable-kvmKVMが利用できる場合のみ指定する
  • 「-usb -device usb-tablet」はVNCでマウス操作がズレないようにするオプション
5. SSHトンネリング接続する(オプション)

※1番目のディスプレイに対するVNCポートが5901です。
※7777は特に意味はありません。

ssh -L 7777:127.0.0.1:5901 root@10.0.0.1
6. VNC Viewer等で接続する

接続先

127.0.0.1:7777
7. WindowsのセットアップやRDP等の設定を行う

f:id:kagasu:20201229003203p:plain:h100

その他