2023/08/01追記
公式機能として実装されました。
本記事内容をあえて実行する必要はありません。
https://staff.hatenablog.com/entry/2023/08/01/160421
Ⅰ. はじめに
タイトルの通り「はてなブログで更新日時を表示する方法」です。
Ⅱ. やり方
1. 以下プログラムを「設定」→「デザイン」→「カスタマイズ」→「記事」→「記事下」に貼り付ける
<script>
async function getUpdatedAt () {
  const createdAt = new Date(document.getElementsByClassName('updated')[0].getAttribute('datetime'))
  const createdYear = createdAt.getFullYear()
  const createdMonth = createdAt.getMonth() + 1
  const response = await fetch(`${location.origin}/sitemap_periodical.xml?year=${createdYear}&month=${createdMonth}`)
  const text = await response.text()
  const xml = new DOMParser().parseFromString(text, 'text/xml')
  const item = Array.from(xml.querySelectorAll('urlset>url')).filter(x => x.querySelector('loc').textContent.includes(location.pathname))[0]
  const updatedAt = new Date(item.querySelector('lastmod').textContent)
  return updatedAt
}

(async () => {
  const updatedAt = await getUpdatedAt()
  const updatedYear = updatedAt.getFullYear()
  const updatedMonth = (updatedAt.getMonth() + 1).toString().padStart(2, '0')
  const updatedDate = updatedAt.getDate().toString().padStart(2, '0')

  const element = document.createElement('span')
  element.innerText = `🔄最終更新 ${updatedYear}-${updatedMonth}-${updatedDate}`
  document.getElementsByClassName('entry-date')[0].appendChild(element)
})()
</script>
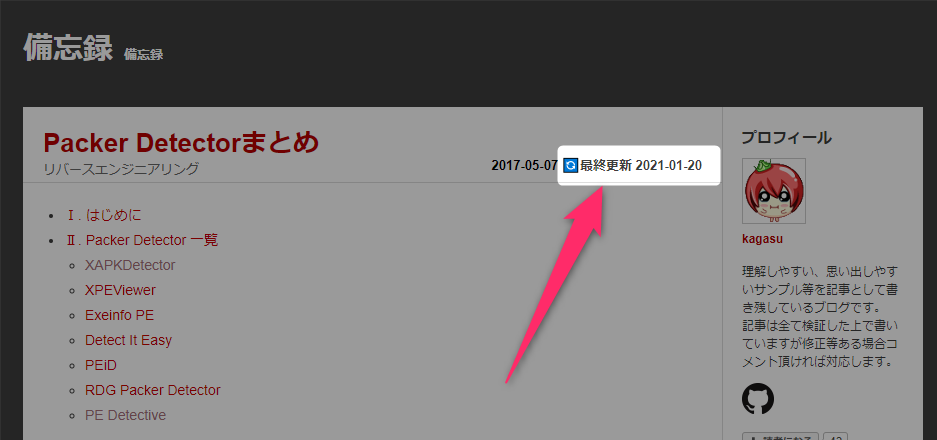
実行結果
更新日時が表示された